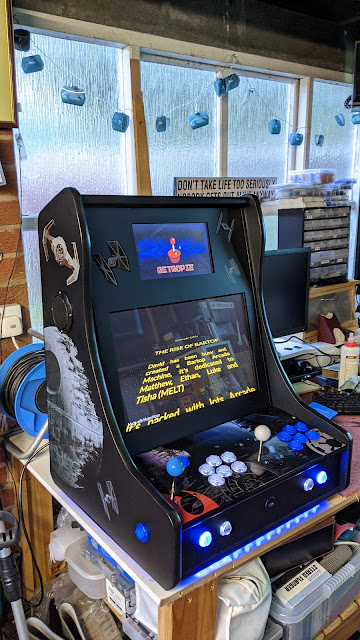
As much as I love the all black finish I think the machine should be loud and proud, Arcade machines are designed to draw attention and make money so with that in mind I designed a Star Wars themed control panel. I sent away to a vinyl printer and I think it turned out exceptionally well.
The vinyl is laminated so it should be hard wearing on the control panel. Installation was simple and just a matter of carefully lining up the artwork (after removing the buttons and joysticks!) and sticking it down with a 5mm overlap. I then used a soft scraper to remove any air bubbles and trimmed the edges with a scalpel.
I think the transformation was amazing and gives the machine a personality. But I hadn't finished yet, I had a set of Star Wars themed wall stickers and applied them on the sides and bezel.
Now we are really getting a theme going. These stickers adhere extremely well to the black vinyl and once again I used the soft scraper to push them on firmly and remove any air bubbles.
One final job was to make a back door, I decide to fit it as a hatch rather than a traditional locking door. The machine isn't going to be anywhere public so I don't think security is an issue. I used 4 magnetic latches to hold the hatch in place and added two silver handles.
I then covered the outside with black vinyl and added the last of my wall stickers to complete the theme. There is no ventilation however I have been monitoring the cpu temperature of the Raspberry Pi and have a fan fitted in the Pi case so I'm not concerned right now.
I have created an intro video and started to theme the marquee screens, I also added a Star Wars theme in Emulation Station but there is plenty more to do to make the machine 100% Star Wars!
Conclusions : All in all I have invested about £400 in this project, I'm sure I could have done this a lot cheaper if I hadn't opted for the second screen (I already had a second screen but it broke after a couple of days and i chose to buy a replacement). I could have installed a PC in the cabinet, which I already had, however I chose a Raspberry Pi instead and went for the top of the range 8GB model. I also purchased a 400GB SD card which was an additional expense. I also spent a bit on router bits for cutting the T-Moulding slots and hole cutting drill bits for the button holes, all of which i can use again on other projects. It was a challenging project in the respect that I hadn't any plans or experience building anything like this however I enjoyed the challenge and love the results.


This comment has been removed by a blog administrator.
ReplyDelete